
 As a roofing contractor, I field a lot of questions about different components of a roof. Enough so that I think a series of blog topics to educate on all the parts would be useful for my prospective clients (and honestly for any homeowner, even if you don’t call me). In a previous series, I thoroughly discussed roof decking (planks, plywood, OSB, installation), typically all installed by carpenters and not by roofers, but what roofers have to start with. In this series, I will discuss all the parts that go under the shingles (and that you don’t otherwise see). Let me know if you find these blogs useful.
When you look at a roof, what do you see? Shingles, they are the visible finish layer. Maybe some metal around penetrations (i.e. chimney, roof vents, plumbing vents, and skylights). Just how much is “below the surface” and more importantly, how much does it matter? Like many things, the devil is in the details and the preparation before the shingles is critical to preventing roof leaks. Some of the items that you don’t see are: 1) Drip Edge (previous blog on this topic) 2) Flashing 3) Ice and Water Shield (previously covered in blog series on ice jams) 4) Underlayment 5) Starter Strips 6) How transitions in the roof are detailed (pitch transitions, chimneys, crickets, headwall, sidewall, valleys, dormers, roof intersections) All of these details get addressed and materials installed before the first shingle gets installed. That is a lot that is “below the surface” and in some subsequent blog topics on these materials Williams Roofing & Construction will delve into importance of each, because all of these really do matter when it comes to installing a long-lasting and leak-free asphalt shingle roof. You will never look at your roof the same way again.
0 Comments
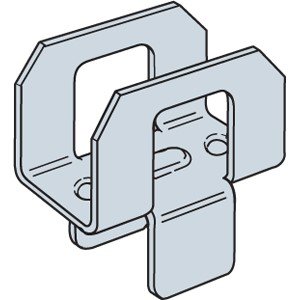 In previous blog topics, I identified what a sheathing or roof deck is, and different materials that may be used. The last topic on sheathing and roof decks components related to Panel Edge Clips; these are also commonly called H-clips and Panel Sheathing Clips depending on how each specific manufacturer markets them.
Panel Edge Clips are installed on panel edges (either OSB or plywood) at the half-way point between the rafters. This clips adjacent panels together and allows for load distribution between panels. This provides a lot of stiffness at what would otherwise be an unsupported edge. In a previous blog on sheathing or roof deck, I identified that both plywood and OSB panels need to be installed with a gap; the Panel Edge Clips provide a uniform gap. From a roofing contractor perspective, I really like Panel Edge Clips because the stiffness allows the sheathing or roof deck to remain flat, especially at the panel transitions. As asphalt roof shingles telegraph imperfections in the sheathing or roof deck, eliminating imperfections is critical. Unfortunately, if your house was not built using Panel Edge Clips they cannot be retrofitted even with a full tear-off of all roofing materials; they can only be installed as the sheathing or roof deck is installed. If I am replacing sheathing or roof deck over a large part of your roof (perhaps as you recover from storm damage), At Williams Roofing & Construction, I always recommend Panel Edge Clips as I find that one or two boxes are all that is needed and the benefits clearly outweigh the minor cost increase in terms of both performance and appearance of the finished product. If I am replacing only a handful of damaged panels, the retrofit opportunity to use Panel Edge Clips really doesn’t present itself. |
Bobby WilliamsWe are an experienced Lees Summit roofing company with over 15 years experience in repair, service and installation. Archives
August 2020
Categories
All
|
 RSS Feed