
 One of the biggest luxuries DIY-motivated homeowners have is time. You have a day job, your DIY home improvements are your hobby. This is something you enjoy after work, on weekends, during your free time. Your home improvements are something you take great pride in doing, doing well, and showing off to others.
But let’s think about this for a minute. How many of these projects have a critical time component associated with them? You have a great bar in your basement, what are the consequences if you got sick in the middle of the job and didn’t finish it on time? What about your fantastic man cave – you know who you are? Or remodeling that guest bedroom? If these took a couple of weeks extra, was it really that big of a deal in the scheme of things? Your roof – you don’t have that luxury. Once you start your roofing project, you need to get it finished. Even if you fall into the thought process that roofing underlayment provides you weather protection until you get shingles installed, let me assure you that this weather protection has a maintenance price. Every rain you will be inspecting your underlayment. Moderate winds will render it useless and any wind-driven rain will result in roof leaks. Roof leaks result in more sheetrock repairs, which as a DIY-capable homeowner you have already proven that sheetrock is a project that you have no fear of. This is one of the greatest factors if you consider a roof a DIY job. When professional roofing contractors start your job, it is going to be finished quickly. And it isn’t just nailing those asphalt shingles up to finish the job; those shingles have a glue strip that needs to set before your roof is truly weather tight. Once you start a roofing project, you want to make sure it gets done and the shingles properly glued => before the next rain.
0 Comments
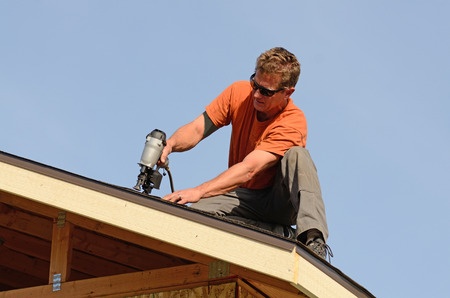 Roofer with pneumatic nailer Roofer with pneumatic nailer This is one of the great advantages professionals bring. We work with our tools every day, so we invest in quality tools and they pay us back. Of course this is one of the greatest advantages of DIY jobs too; with the money you save you want more tools. This is a universal of DIY-motivated homeowners => tools are good and more tools are better!!!
But it isn’t just the tools. You need to understand how to use those tools to get the most out of them. Every time you put a new tool in your hand, there is a learning curve. A hammer, a Roofing Utility Knife, and a Hack Saw will get you a long way. You could hammer every nail, and old timers certainly did it this way before pneumatic tools, but then there is skill to hammering nails as well (keep them straight, don’t smack your thumb, don’t underdrive the nails, and don’t damage the shingles). Back to some basic math though, a typical roof is 30-squares, each square is 3-bundles, each bundle is 20-shingles, and each shingle takes 4-6 nails (this depends on roof slope and prevailing wind considerations) – this is right around 10,000 nails. Have fun with that. Again though, DIY jobs are about opportunity to buy a new tool. For a job you are going to do once, you are probably shopping at the discount tool supplier. Let me caution you to NOT do this; good tools are worth the investment. If you are going to nail 10,000 nails, you will appreciate the difference by the end of the job. Sure, you need a pneumatic coil nailer. Now you need an air compressor too. Are you going to be doing this by yourself, because if you have friends helping you (and those are GOOD friends), you need more nailers and you need a bigger air compressor. But it isn’t just the tools either. If you set the pressure to your air compressor too low, you will be finish hammering every nail in. If you set the pressure to your air compressor too high, you will damage shingles and have to replace them. If you don’t hold that nailer perpendicular to the roof, you won’t drive nails straight and this again damages shingles. Sure, this isn’t brain surgery, but it isn’t something you pick up and use perfectly the first time either. And this is simply a single tool you need. Professional roofing contractors bring many other tools to the job, all professional grade, and more importantly we aren’t learning to use new tools on your roofing job. 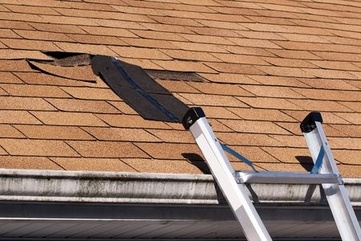 Among roofing contractors, there is a lot of debate about the purpose of underlayment and what type you should use. Some roofing contractors will tell you that underlayment’s only purpose is to “dry-in” the structure before the roof shingles are installed and that once the roof shingles are installed that the underlayment serves no purpose as the shingles themselves provide a waterproof roof. This sounds good, but I recently inspected a roof on a five (5) year old house (basically brand new) that had roof leaks EVERYWHERE. Upon inspection, it was clear that the roofer didn’t install underlayment. This basically “new” roof required a complete tear off and new roof including replacement of large portions of the roof deck itself. The general contractor that built this house skimped on a relatively cheap underlayment layer, and left the homeowners with a very large repair bill. I know the roofing contractor that got that job (not me), and they will get a proper installation this time.
For the roofing contractors that identify that underlayment isn’t necessary, kindly explain to me why every shingle manufacturer includes underlayment in their installation instructions? There isn’t a shingle manufacturer in existence that doesn’t include underlayment in installation requirements, and not one of them will honor a warranty claim on their shingles without it. I fall into that underlayment is another component of the waterproofing system that protects the roof deck material itself. Underlayment provides a second line of defense against wind driven rain. In addition, have you ever seen a roof with a shingle or two blown off? If you lose a shingle due to wind and you have no underlayment you have a guaranteed roof leak. With underlayment you may not have a roof leak even if you lose a couple of shingles in a storm. However, wind driven rain gets everywhere, every nook and cranny, even causing water to flow uphill for short periods, and redundancy matters. My experience is that underlayment also serves a secondary purpose of establishing a smooth surface for you roofing shingles. In my previous series on roof decks, I identified that asphalt roofing shingles telegraph surface imperfections; a good quality underlayment is layer that ensures a perfectly smooth roof surface, thus eliminating potential to telegraph imperfections. For this reason, I always install 30-lb felt as underlayment as it provides a thicker surface that the cheaper 15-lb felt. 15-lb felt tears too easily around the nails or staples, tears too easily when walking on it to install the shingles, and is difficult to lay down without wrinkles. All of these tears lead to imperfections in the surface, and potentially lead to telegraphing through asphalt shingles. 30-lb roofing felt minimizes or eliminates these shortcomings. On a typical 30-square roof, 3,000 square feet of roof itself, underlayment material costs for 30-lb felt are ~$300. As your house is probably you largest investment, do you want to skimp $300 on the price of a new roof? Those homeowners I talked about earlier would have gladly paid $300 more for their new house to prevent the magnitude of roof repair they had to undertake on their “almost new” house. Seriously, that general contractor should be barred from obtaining any more building permits. If you need help with an issue such as this, contact a local Lees Summit roofing contractor for assistance.  Residential roofs have slope, and water flows downhill. The slope of your roof provides a mechanism for the roof to shed water (gravity). However, there are areas of the roof that may allow water to accumulate. Think about a skylight or chimney; water is running down your roof and hits a chimney or skylight frame, what happens next? The flow of water off the roof is disturbed and there is potential for water accumulation; that water has to go somewhere. If you can’t direct water off your roof, it gets into your house via leaks in the roof. The picture I have included provides a perfect example of a chimney disturbing this water.
Flashing is material used to waterproof the roof at penetrations through the roof deck or transitions in the roof deck. When you look at your roof, common penetrations would be chimneys, roof vents, plumbing vents, and skylights. Transitions are where the plane of the roof changes and would commonly be at crickets, vertical wall transitions, and valleys. The rest of the roof deck has other waterproofing materials (i.e. ice and water shield and underlayment); flashing works in conjunction with these elements to reinforce and supplement waterproofing at these critical areas. Gravity is very efficient, water is very damaging, and the combination of the two will leak water into every nook and cranny on your roof, which necessitates and that your roofing contractor install an effective waterproofing system. What flashing does is to ensure that any water that gets into these nooks and crannies gets efficiently redirected back out to the topside of the roofing material, where it belongs. Flashing is often installed in multiple layers (called counter-flashing), and seams are frequently sealed (especially important around chimneys and vertical wall transitions). With waterproofing, redundancy and details matter. With masonry chimneys, even the best flashing may not be enough as masonry itself is porous and absorbs water; even a minute amount of water behind the waterproofing system needs to get out. On the picture, the chimney flashing is typical but far from correct and will allow for water leak between the chimney and the flashing itself as water sheds down the vertical chimney. A proper installation would have the flashing embedded into the mortar, so water running down the outside of the chimney would be redirected to the roof surface. This is not an inexpensive house; these homeowners are going to be very disappointed. If you experience a roof leak, more often than not it is because of improperly installed, improperly detailed, or deteriorated flashing. When I inspect roofs to repair leaks (vs. replacing roofs), the first place I inspect when I get on the roof is the flashing. This element is critical to get right, and to get right from the beginning. The next question becomes what is the best. That is easy, heavy gauge copper, overlapped and lead-soldered at any joints. Look at old slate roofs (>50 years old), and this is what you will find. Copper is expensive, lead solder is dangerous for the installer, and roof materials that aren’t intended to last hundreds of years don’t warrant flashing material that does. In residential roofing, the flashing I use is galvanized steel. When selecting a roofing contractor, finding one that gets uber-excited when talking flashing details should be one of your selection criteria.  As a roofing contractor, I field a lot of questions about different components of a roof. Enough so that I think a series of blog topics to educate on all the parts would be useful for my prospective clients (and honestly for any homeowner, even if you don’t call me). In a previous series, I thoroughly discussed roof decking (planks, plywood, OSB, installation), typically all installed by carpenters and not by roofers, but what roofers have to start with. In this series, I will discuss all the parts that go under the shingles (and that you don’t otherwise see). Let me know if you find these blogs useful.
When you look at a roof, what do you see? Shingles, they are the visible finish layer. Maybe some metal around penetrations (i.e. chimney, roof vents, plumbing vents, and skylights). Just how much is “below the surface” and more importantly, how much does it matter? Like many things, the devil is in the details and the preparation before the shingles is critical to preventing roof leaks. Some of the items that you don’t see are: 1) Drip Edge (previous blog on this topic) 2) Flashing 3) Ice and Water Shield (previously covered in blog series on ice jams) 4) Underlayment 5) Starter Strips 6) How transitions in the roof are detailed (pitch transitions, chimneys, crickets, headwall, sidewall, valleys, dormers, roof intersections) All of these details get addressed and materials installed before the first shingle gets installed. That is a lot that is “below the surface” and in some subsequent blog topics on these materials Williams Roofing & Construction will delve into importance of each, because all of these really do matter when it comes to installing a long-lasting and leak-free asphalt shingle roof. You will never look at your roof the same way again. |
Bobby WilliamsWe are an experienced Lees Summit roofing company with over 15 years experience in repair, service and installation. Archives
August 2020
Categories
All
|
 RSS Feed