
|
With all the ice we've had across Missouri lately, as a local roofing contractor I'm concerned about the safety of homeowners across the area and want to share some great information in a series I published a few years ago regarding ice buildup on a homeowners roof and what to do about it. Stay tuned this week for the full series on ice, and if there's any necessity for you to contact an experienced roofing professional to get your questions answered.
Ice Dams Series, Part 1
0 Comments
 Here in Jackson County and surrounding areas, we were enjoying unseasonably warm temperatures and fantastic weather, but now that the cold weather is here, it is important to do some preventative maintenance on your roof to prepare it to withstand winter. According to El Nino, we are likely to be warmer than normal, but also more moisture, so having your roof in tip-top shape is important.
Where do you start? First, make sure your gutters are clean and drain well. Most of the leaves are off the trees, and if you have trees overhang your roof they are also in your gutters. It is critical that any water on your roof have a clear drainage path, and having gutters clean is critical to this drainage path. This drainage path will also help alleviate ice dams, depending on how cold we may get. While you are cleaning your gutters, check for missing or damaged shingles. You can typically see missing shingles from the ground level, but there are areas of your roof that you can only properly observe from a higher vantage point. If you have any trees that overhang the roof, the branches can contact the roof and this will cause damage to shingles. Also any twigs or fallen or broken branches on your roof can potentially cause damage. These branches should be trimmed, and any damaged roof shingles replaced. Shingles have glue strips, and the unseasonably warm temperatures we are having will ensure your glue strips activate prior to winter’s cold. And last, check your flashings. Especially plumbing and vent stacks, as these flashings have a rubber seal to ensure the seal to the roof penetration is tight. This rubber breaks down with ultraviolet (sun) exposure. When the rubber breaks down, this will result in a roof leak. If you don’t want to climb onto your roof, you can call a professional roofing contractor to provide this service as well.  Thermal Bridging on Roof Thermal Bridging on Roof After the last show event in Lees Summit, I went out into the neighborhood and snapped some pictures to illustrate some common roofing problems you may want to address with your roofing contractor next time you need a new roof. You may want to look at your own roof and snap some photos even if you don’t need a new roof, because you eventually will and this data is perishable and will be long lost when you eventually replace your roof.
See the lines on this roof? Why is it that the snow melts and leaves a pattern of perpendicular lines? This is called “thermal bridging” and illustrates the location of individual framing members. This pattern would be particularly pronounced for light-gauge steel framing (which may have been used in residential construction prior to steel prices increasing), but is still visible in wood-frame construction. Since the insulating value of you framing members is less than the insulation, each framing member acts as a thermal bridge directly to the outside. This provides a conduit to transfer or leak heat, which melts the snow into this interesting pattern. Note on the left side of the photograph where this doesn’t happen? Same roof slope, same sun exposure, the difference is that the left side is the roof over an unheated garage; minimizing the heat escaping into the attic and also the thermal bridge from the roof framing. In the Lees Summit locale, this generally isn’t or doesn’t lead to a roofing problem. If the pattern is reversed however, where the snow melts between the roofing members, this indicates too much heat loss and can lead to ice damming. 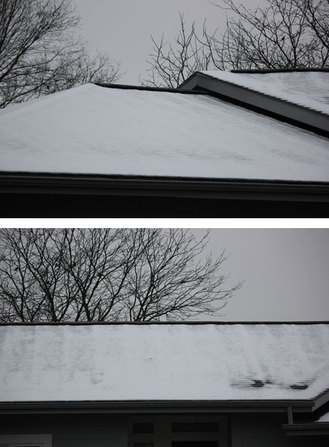 After the last snow event in Lees Summit, I went out into the neighborhood and snapped some pictures. This one shows how well a ridge vent works and is something your roofing contractor should install when you do need a new roof.
In a previous blog on ice dams, I identified that one of the ways to prevent ice dams was better roof and attic space venting. While this roof has an inadequate amount of ridge vent (typical of a hip roof), and is relatively low pitch (~4:12), it does show the effectiveness of ridge vents in our locale as the vent itself is completely clear and working well (and thus minimizing potential for ice dams). People tend to think that ridge vents will get blocked by snow, closing the vent and rendering them completely ineffective. However note that the snow is even coated on the roof, but the ridge vent remains completely clear. This is actually a GAF Cobra Snow Country Vent, but other roofing manufacturers have their own equivalent ridge vents that are comparable. Now then, what if you see the ridge vent blocked? This would be a problem. Ridge vents are the exhaust vents, the intake vents or in the soffits, or roof overhangs. If there is insufficient intake venting, there is not going to be enough airflow out the ridge vent to keep it clear. Inadequate venting can lead to ice jam problems. In the picture, the ridge vent is accompanied by a continuous soffit vent which offers more than adequate airflow. Again, following a snowstorm is a great opportunity to snap some pictures of your roof that will be valuable later when you need your roof replaced. Your roofing contractor won't see what snow patterns you have on your roof when they are replacing it in much more pleasant weather conditions, and you can share y our winter pictures with them. 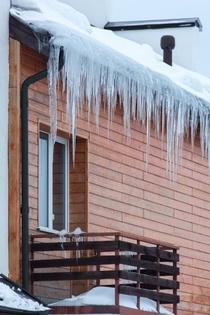 We have previously identified what ice dams are, how they form, resulting damages, and preventive steps you can take without installing a new roof. However the ultimate fix to preventing ice dams comes when it is time for new roof installation.
Preventing Ice Dams – New Roof Considerations Section R806 of the International Residential Code (IRC) for one and two family dwellings, adopted by Lees Summit and other local municipalities, establishes roof venting requirements. Your local roofing contractor should be familiar with, and apply, the IRC roof venting requirements. I like to install both a continuous soffit vent and ridge vent solution. In minimizing potential for ice dams, I had recommended increasing insulation in your attic floor to a minimum of 14” of dense-packed cellulose; this recommendation means I may need to install baffles at the roof edges to ensure that the ventilation air entering through the soffits can reach the attic space. This ensures an entirely passive ventilation system where air enters through the soffits and exits through the eaves. In doing so, the attic space will automatically stay at or near the same temperature as the ambient air, thus eliminating any potential to melt the snow on your roof from underneath and causing drainage. And since your attic is already properly insulated, there is absolutely no downside as it relates to your utility bills. As a benefit, this venting will increase the life of your roof by preventing overheating in the summertime as well. Some may criticize the ridge vent solution and say it will get covered with snow itself, but my experience has demonstrated that passive ventilation prevents snow from building up near the ridge vent to start with, even heavy snows. The second preventative step is to eliminate potential for ice dam damage, if an ice dam would occur. While this is entirely optional, the only time you can install this measure is when a new roof is being installed. And as the cost increase is minimal, I recommend this as cheap insurance. Ice and Water Shield is a peel-and-stick underlayment used instead of traditional roofing felt underlayment. I like to install this so that the Ice and Water shield extends up the roof for twice the distance of the eave depth. If you have a one (1) foot eave, I recommend Ice and Water Shield extend a total of three (3) feet up the roof (covering the eave, and twice the eave depth up the roof). For a two (2) foot eave, I recommend Ice and Water Shield extend a total of six (6) feet up the roof. As Ice and Water Shield comes in three (3) foot width rolls, this would correspond to either one (1) or two (2) passes. While Ice and Water Shield doesn’t prevent ice dams, it does make the roof watertight and prevents damages if ice dams form. This is why I consider it my insurance step; do everything possible to prevent ice dams from forming first and consider this insurance only. Follow these steps, and you can retire your snow rake and enjoy the winter wonderland without worrying about the danger that lurks beneath. 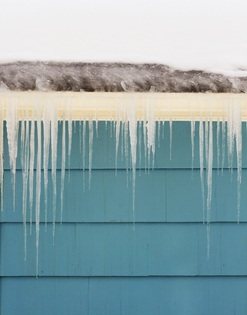 In an earlier blog, I explained what an ice dam, how it forms, and trouble it leads to. If you see evidence of an ice dam forming, you need to address this immediately. And this isn’t the time to install a new roof, although when you need a new roof you have additional opportunities to address ice dams.
Ice Dams are caused by warm air in the attic melting the exterior snow, and solving this problem is the first step in getting rid of ice dam problems. You need better attic insulation to prevent that heat from your comfy, warm house from getting into the attic space to start with. And this has the added benefit of saving you money on utility bills and making your furnace or heat pump run more efficiently (you are paying for all the heat that escapes). I recommend a minimum of R-50 insulation over your ceiling joists, and this corresponds to at least 14” of blown in, dense-packed cellulose. This isn’t 14” installed height (it is light and airy when blown in), but 14” after settling. This probably corresponds to 18” of installed height. Code minimum in Lees Summit is R-30 for ceilings, and this is insufficient to prevent ice dams from forming. Minimize the warm air escaping to the attic and minimize that snow from melting in the first place. Ice dams are caused when snowmelt from your roof hits the cold area at the eaves of your roof. This cold area refreezes the water before it can drain off the roof. This is a second opportunity in preventing ice dams (some would consider this the first, but insulation can be done from the warm confines of your home and not outside). You want a long-handled snow rake, available at many home improvement stores or through the Internet. Every time it snows, you need to get outside and get the snow off your roof. I wouldn’t worry about all of the snow; I would worry about the snow over the eaves where the ice dam forms. This way, any snow melt that forms over the heated area of your house (although minimized through additional insulation) has a straight (and fast) shot into your gutters, and once it is in your gutters it is off the roof and not causing or perpetuating an ice dam. Lack of insulation isn’t the only common heat source from your living area into the attic space. Do you have recessed lighting (can lights)? People love them; they look fantastic. Builders love them because they are cheap and people love the elegant look. Builder’s grade can lights have a unique feature in that they build-up heat and have to have a way to shed that heat. In doing so, you have to keep insulation at least 3-4” away from the housings, otherwise they overheat. And they also have vented housings. Do you use a chimney starter for your charcoal grill? Once that fire gets started, it creates a chimney effect as heat rises, and fresh combustion air is drawn in through vents in the bottom of the starter. Well, that light bulb in a can light operates the same way; heat (from the light bulb) rises and vents, and makeup air comes from directly inside your house. Every can light you have is approximately one square foot of uninsulated attic, and to make matters worse they also create a chimney effect pulling even more of your heat into the attic space. And what does that heat do? It melts snow, and that creates ice dams. Can lights need to be properly sealed in the attic, and have sufficient insulation around them to prevent heat loss. In Lees Summit, you can plan on using that roof rake several times per year. These are items you can do to prevent ice dams without calling a roofing contractor. 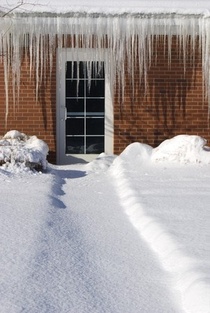 What Are Ice Ice Dams?
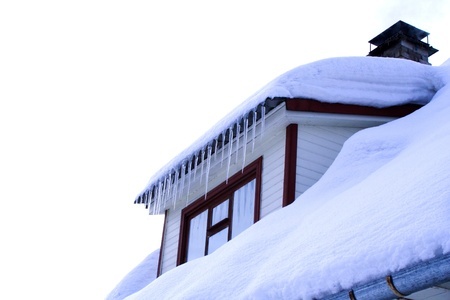
This will be the first in a series of blog topics about ice dams. After we define what ice dams are and how they are caused, I will follow-up with topics on steps you can take to prevent them without installing a new roof, and steps you should consider when installing a new roof. I understand that the answer to every roof problem isn’t, “install a new roof,” as you may have a roof that has considerable service life remaining if you can address some problems. Ice dams are exactly what they sound like; dams made of ice that prevent snow melt from draining off your roof. And this is the problem, they prevent water from draining off your sloped roof and pool water, leading to roof leaks, potential mold and mildew, insulation damage, structural damage, and aesthetic damages associated with large roof leaks. In an earlier blog, I talked about small roof leaks; roof leaks from ice dams are not small. What Causes Ice Dams? After a large snow, everything is so peaceful and snow covered. It is beautiful, the sun comes out, the sky is crisp and clear azure, uniform snow covering that has no markings; truly a winter wonderland. That wonderland can quickly turn though. Trouble lurks just beneath the surface. Heat rises, and heat from your comfy warm house collects in the attic. This heat causes the snow to melt and the sloped roof allows this snowmelt to drain towards your gutters. However, at the edge of your roof, you have an eave that doesn’t have a warm attic below it. The snow doesn’t melt at the eave. What happens when this draining water hits the area of the roof that isn’t warmed? That water freezes, almost instantly, before it has an opportunity to get into your gutter. Do you see that beautiful icicle hanging? That is evidence of what happens when water hits the cold air. And it isn’t just icicles that are formed, you can form a thick ridge of ice right at your eaves. That thick ridge of ice is called an ice dam, and once it is formed trouble will ensue until it is removed. Every time snow melts on your roof and tries to drain, it will run into that ice dam, pool, and ultimately re-freeze. Once an ice dam is formed, it is self-perpetuating. Here in Lees Summit, we have both snow and ice storms that can contribute to ice dams. If you see evidence of an ice dam forming, you may want to call a local roofing contractor to address this problem immediately. |
Bobby WilliamsWe are an experienced Lees Summit roofing company with over 15 years experience in repair, service and installation. Archives
August 2020
Categories
All
|
 RSS Feed