
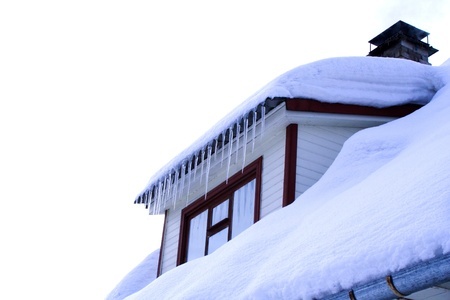
 Here in Jackson County and surrounding areas, we were enjoying unseasonably warm temperatures and fantastic weather, but now that the cold weather is here, it is important to do some preventative maintenance on your roof to prepare it to withstand winter. According to El Nino, we are likely to be warmer than normal, but also more moisture, so having your roof in tip-top shape is important.
Where do you start? First, make sure your gutters are clean and drain well. Most of the leaves are off the trees, and if you have trees overhang your roof they are also in your gutters. It is critical that any water on your roof have a clear drainage path, and having gutters clean is critical to this drainage path. This drainage path will also help alleviate ice dams, depending on how cold we may get. While you are cleaning your gutters, check for missing or damaged shingles. You can typically see missing shingles from the ground level, but there are areas of your roof that you can only properly observe from a higher vantage point. If you have any trees that overhang the roof, the branches can contact the roof and this will cause damage to shingles. Also any twigs or fallen or broken branches on your roof can potentially cause damage. These branches should be trimmed, and any damaged roof shingles replaced. Shingles have glue strips, and the unseasonably warm temperatures we are having will ensure your glue strips activate prior to winter’s cold. And last, check your flashings. Especially plumbing and vent stacks, as these flashings have a rubber seal to ensure the seal to the roof penetration is tight. This rubber breaks down with ultraviolet (sun) exposure. When the rubber breaks down, this will result in a roof leak. If you don’t want to climb onto your roof, you can call a professional roofing contractor to provide this service as well.
0 Comments
 DIY-capable homeowners do their research. They select the best products, they shop for the best prices. Certainly warranty of the underlying material is part of what drove you to selecting your roofing materials. A new roof is a significant investment with a long life (30-50 years on asphalt shingles). A good warranty could save you a bundle, in the event there are problems in the future.
However, the manufacturer’s warranty only covers manufacturing defects in the roofing material itself. Architectural shingles may well include a Lifetime limited warranty from manufacturing defects to the original homeowner. This may even be transferrable to the next subsequent homeowner (if you sell your house). However note that this is shingles only, many other materials (read the under the shingles series) do not have the same warranty. More importantly, this warranty doesn’t cover two (2) items:
Asphalt roofing companies operate high-technology manufacturing plants; the risk of manufacturing defects is very low; hence why they can offer generous warranties. At the same time, manufacturers are very aggressive in inspecting the roof prior to providing warranty coverage and have identified that most causes of “warranty” claims are due to the installer’s workmanship, and not the material itself. I have seen situations of delaminating shingles where the manufacturer simply dropped a handful of new bundles on the driveway and left. So while you may think you have limited-Lifetime coverage, you may have nothing. What can you do to protect yourself? As a professional roofing contractor in business for over 20 years, and with intent to stay in business and service my customers longer, I provide warranty coverage against any errors in workmanship. In addition, I am “Installer Certified” for several lines of asphalt shingles that I install; the manufacturer’s warranty includes a reasonable labor or installation cost to repair or replaced manufacturing defects in these situations. One of the biggest motivations of DIY is saving money. Make sure you understand the limitations of the manufacturer’s warranty. More importantly though, make sure you don’t try to spend dollars to chase dimes. By that I mean, don’t try to save money on your roof by DIY if you think you will have warranty coverage later. And with your house as your most significant investment, do you really want to risk your first line of defense against the weather to trying to save a few dollars? You likely have other home improvements you would like to focus on; leaving roofing to the roofing professionals will enable you to undertake these other projects, and know that you have warranty coverage for installation and workmanship errors as well as labor in the situation of manufacturer’s defect.  As a roofing contractor, I field a lot of questions about different components of a roof. Enough so that I think a series of blog topics to educate on all the parts would be useful for my prospective clients (and honestly for any homeowner, even if you don’t call me). In a previous series, I thoroughly discussed roof decking (planks, plywood, OSB, installation), typically all installed by carpenters and not by roofers, but what roofers have to start with. In this series, I will discuss all the parts that go under the shingles (and that you don’t otherwise see). Let me know if you find these blogs useful.
When you look at a roof, what do you see? Shingles, they are the visible finish layer. Maybe some metal around penetrations (i.e. chimney, roof vents, plumbing vents, and skylights). Just how much is “below the surface” and more importantly, how much does it matter? Like many things, the devil is in the details and the preparation before the shingles is critical to preventing roof leaks. Some of the items that you don’t see are: 1) Drip Edge (previous blog on this topic) 2) Flashing 3) Ice and Water Shield (previously covered in blog series on ice jams) 4) Underlayment 5) Starter Strips 6) How transitions in the roof are detailed (pitch transitions, chimneys, crickets, headwall, sidewall, valleys, dormers, roof intersections) All of these details get addressed and materials installed before the first shingle gets installed. That is a lot that is “below the surface” and in some subsequent blog topics on these materials Williams Roofing & Construction will delve into importance of each, because all of these really do matter when it comes to installing a long-lasting and leak-free asphalt shingle roof. You will never look at your roof the same way again.  Storm Damaged Roof Storm Damaged Roof In previous blog topics, I identified what a sheathing or roof deck is, and identified that it is commonly plywood or oriented strand board (OSB). I have further expanded this discussion to identify how plywood is manufactured, how OSB is manufactured, and why both are superior to wood planks that may have been used in distance past. However one of the questions I regularly field is OSB vs. plywood, which is superior?
From a roofing contractor perspective, for new house construction the sheathing or roof deck is installed by the carpenters. For replacement roofs, for jobs the roofing contractor tears off the old roof, we have an opportunity to inspect the sheathing or roof deck and replace is necessary. Where we see damages to sheathing or roof deck, it is usually the result of a roof leak. Some factors that enter into the homeowners or roofing contractor’s decision to use OSB vs. plywood for repairing damaged sheathing or roof deck include typically limited to cost. As both are wood commodities the price of plywood and OSB are variable and change almost daily. Sometimes plywood is cheaper, sometimes OSB is cheaper. When the contractor built your house, you can bet this was the deciding factor. While some roofing companies will sell you on performance differences, the Engineered Wood Association identifies that plywood and OSB are structurally equivalent. Among the general public, there is a perception that plywood is higher quality; probably based entirely on appearance as plywood is still recognizable as wood and has an appearance they are familiar with. For this reason alone, the homeowners decision would drive plywood vs. OSB decision. I will tell you that there are distinct differences in performance with prolonged exposure to water. With prolonged exposure to water plywood is definitely the superior product. When plywood gets wet, it swells consistently and will return to its original dimensions as it dries; not so with OSB. When OSB gets wet, it can remain swollen as it dries out, resulting in sheathing or roof deck that is no longer smooth and this will telegraph through to the finished roof when using asphalt shingles (we previously identified that smooth sheathing or roof deck is critical). As a roofing contractor that has been in business over 25 years, I didn’t stay in business this long because my roofs leak. Since my roofs don’t leak, the decision to install plywood vs. OSB is job specific and includes input from the homeowner on what they prefer and the finished cost.  Composite Roofing Shingles Composite Roofing Shingles There are many roofing materials to pick from, and many people prefer the aesthetics of natural materials. Natural materials include wood, clay, and slate. And while many of our local homeowners associations in Jackson County Missouri used to require natural materials, more and more of them are changing this restriction to allow my choice of materials; architectural composite shingles. It used to be that composite meant only three-tab shingles, and these were definitely the “budget” solution for roofs; which is why homeowners associations did not allow their use. However, composite shingles have come a long way and architectural composite shingles are being embraced by more builders and homeowners associations at all price points.
The reasons for this transition are simple. Architectural composite shingles are available in a variety of styles and colors to complement any style home and offer a variety of aesthetics beyond any of the natural materials. Do you like the aesthetics of wood shingles? I can’t blame you, they look great. However we can get architectural shingles that mimic new cedar or weathered wood (depending on your aesthetic preference), something natural wood as a material cannot provide. And we can do so with less cost, less maintenance considerations, longer life, and a number of other benefits. Do you have a house with stucco finish that would look great with clay tiles? Again we can get architectural shingles that mimic clay tiles and do so with significantly less cost, less weight (clay tiles are heavy and need substantially stronger roof structure to support the weight), and less maintenance issues. What about a brick house that would look great with slate roofing? One more time, we can provide architectural shingles that mimic slate roofing and do so at significantly less cost, less weight, and less maintenance issues. Both clay and slate are brittle, so access for maintenance becomes challenging in addition to these materials also breaking. And the biggest advantage of architectural composite shingles vs. natural materials is the adhesive bond between shingles. Wood, clay, and slate shingles are loosely attached and as natural materials will have slight movement. Composite shingles have an adhesive strip on the underside that allows the shingles to bond together when exposed to heat from the sun. This provides an extra level of protection against wind driven rain. While natural materials such as clay and slate typically have higher wind resistance, a properly installed composite shingle roof can also meet the same hurricane standards (that don’t apply here in Missouri, but demonstrate wind resistance). Ask your roofing contractor if architectural composite shingles are the right choice for you, and the advantages to composite. With architectural composite shingles, you can have your cake and eat it too. You can get a roof that complements any architectural style of house, and do so with less cost, easier maintenance, and other benefits inherent in composite shingles. 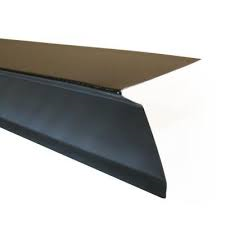 Roof Drip Edge Roof Drip Edge Have you ever watched one of your neighbors get a new roof? Wow, that house always looks so much better with a new roof than it did with the old roof. There is much more to a roof than just new shingles though; but shingles are the only part you see from the ground. Architectural shingles sure look nice though.
Flashing, while critical, isn’t something homeowners are likely to think about. Do you have a fireplace and associated chimney? What about a gas furnace or hot water heater? Do you have indoor plumbing? What about skylights? Do you have a valley where different roof pitches meet? What about areas where a wall meets a roof? What all of these have in common is that metal flashing is used to seal these areas. Without proper use and installation of this metal flashing, you are likely to have roof leaks. Your home is your most valuable asset, and your roof is your first line of defense to protect this asset. Leaks due to improper flashing is not how you protect this asset. Drip Edges are installed at eaves and gables, and prevent any moisture exposure to the exposed edge of the roof decking material (either plywood or oriented strand board – OSB). They also deflect rainwater from the exterior surface, such as your fascia board and into your gutter. There are different profiles of drip edge, depending on application and how much protection you want and how much you want to spend. A lot of roofing contractors will use an L-shape drip edge of the cheapest material, because that is all that is required by code (drip edge is a recent addition to the International Residential Code, depending on the age of your roof you may not hava a drip edge at all). I like to install a DL-lip type overhang profile drip edge. Also, there is some discrepancy on proper installation of drip edge; I install drip edge under the overlayment at the eave, but use drip edge over the underlayment as the gables. The price difference between a stick (10 linear feet) of L-shape drip edge and the overhang profile is about $0.50 more per stick. On a typical house, the cost increase between minimum flashing and drip edge vs. upgraded flashing and drip edge is negligible; but it is the minor details that ensures your new roof will be trouble-free for a very long time. Ask your roofing contractor about flashing and drip edge details before, not after, installation of your new roof. 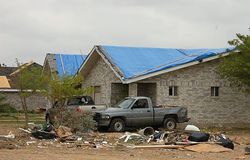 FEMA News Photo Roofing Tarps FEMA News Photo Roofing Tarps In Lees Summit, this has been a most unusual winter. We have warm days approaching 70-F, and yet only a couple of days later we have high only approaching 30-F. And the see-saw continues. These wide variances in weather conditions make me wonder what the severity of our spring storms might look like. Hail, wind driven rain, tornadoes; all widespread will damage a lot of roofs and create needs for both repair and replacement.
My roofing company, as with most established roofing contractors, maintains crews based on work we have available. Following storm or natural disasters, there is far more roof work than local roofing contractors can support. This leads to an influx of migrant roofing contractors, swooping in to grab storm-related insurance work, and they will certainly move on once a larger storm happens elsewhere or once the roof replacement work dries up. I encourage you to hire a local roofing contractor for roof repairs. Your house is likely your single largest investment. And the roof is your first line of defense in protecting your house. With some types of shingles, a roof may last 25-30 years, or even longer. The reasons to select a local roofer are many: 1) The roof being installed comes with a manufacturer’s warranty. That warranty is only as good as the manufacturer that stands behind it, but proper installation is also crucial to ensure the manufacturer honors the warranty. When you select a local roofing contractor, you can ensure that the installer is available later. How are you going to get support from a migrant roofing contractor? 2) It isn’t just the roof shingles; these are only one part of a bigger system including underlayment, ice and water shield, flashing, and venting. While you only see the shingles, every component is critical. Migrant roofing contractors are chasing money only, and are likely to cut costs in ways you cannot see. Local roofing contractors that rely on referrals don’t have that luxury. 3) We are properly licensed by the state of Missouri, and even the localities we do work in. 4) We are insured, for your protection. 5) We have a proven reputation within the community; this is among our most valuable intangible assets. While I agree that there will be more work following storms than local roofing contractors can handle, and it may take some time to get a new roof, we can install a short-term solution such as a properly secured tarp roof. This may not be the most attractive, but it is likely at least some of your neighbors have these as well. A properly installed and secured tarp will provide 90-120 days of protection, which gives local roofing contractor time to schedule a proper roof replacement. Your house is your largest asset. Are you willing to trust a transient roof contractor to provide the first line of defense and protection? 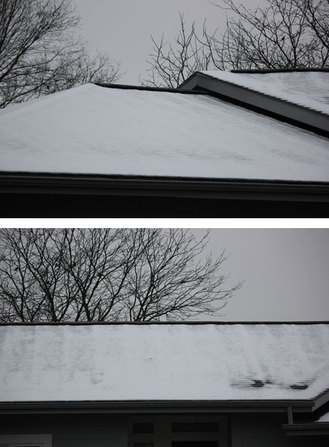 After the last snow event in Lees Summit, I went out into the neighborhood and snapped some pictures. This one shows how well a ridge vent works and is something your roofing contractor should install when you do need a new roof.
In a previous blog on ice dams, I identified that one of the ways to prevent ice dams was better roof and attic space venting. While this roof has an inadequate amount of ridge vent (typical of a hip roof), and is relatively low pitch (~4:12), it does show the effectiveness of ridge vents in our locale as the vent itself is completely clear and working well (and thus minimizing potential for ice dams). People tend to think that ridge vents will get blocked by snow, closing the vent and rendering them completely ineffective. However note that the snow is even coated on the roof, but the ridge vent remains completely clear. This is actually a GAF Cobra Snow Country Vent, but other roofing manufacturers have their own equivalent ridge vents that are comparable. Now then, what if you see the ridge vent blocked? This would be a problem. Ridge vents are the exhaust vents, the intake vents or in the soffits, or roof overhangs. If there is insufficient intake venting, there is not going to be enough airflow out the ridge vent to keep it clear. Inadequate venting can lead to ice jam problems. In the picture, the ridge vent is accompanied by a continuous soffit vent which offers more than adequate airflow. Again, following a snowstorm is a great opportunity to snap some pictures of your roof that will be valuable later when you need your roof replaced. Your roofing contractor won't see what snow patterns you have on your roof when they are replacing it in much more pleasant weather conditions, and you can share y our winter pictures with them. 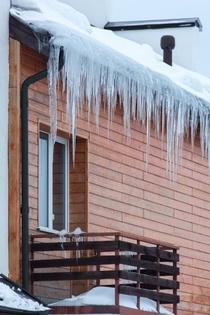 We have previously identified what ice dams are, how they form, resulting damages, and preventive steps you can take without installing a new roof. However the ultimate fix to preventing ice dams comes when it is time for new roof installation.
Preventing Ice Dams – New Roof Considerations Section R806 of the International Residential Code (IRC) for one and two family dwellings, adopted by Lees Summit and other local municipalities, establishes roof venting requirements. Your local roofing contractor should be familiar with, and apply, the IRC roof venting requirements. I like to install both a continuous soffit vent and ridge vent solution. In minimizing potential for ice dams, I had recommended increasing insulation in your attic floor to a minimum of 14” of dense-packed cellulose; this recommendation means I may need to install baffles at the roof edges to ensure that the ventilation air entering through the soffits can reach the attic space. This ensures an entirely passive ventilation system where air enters through the soffits and exits through the eaves. In doing so, the attic space will automatically stay at or near the same temperature as the ambient air, thus eliminating any potential to melt the snow on your roof from underneath and causing drainage. And since your attic is already properly insulated, there is absolutely no downside as it relates to your utility bills. As a benefit, this venting will increase the life of your roof by preventing overheating in the summertime as well. Some may criticize the ridge vent solution and say it will get covered with snow itself, but my experience has demonstrated that passive ventilation prevents snow from building up near the ridge vent to start with, even heavy snows. The second preventative step is to eliminate potential for ice dam damage, if an ice dam would occur. While this is entirely optional, the only time you can install this measure is when a new roof is being installed. And as the cost increase is minimal, I recommend this as cheap insurance. Ice and Water Shield is a peel-and-stick underlayment used instead of traditional roofing felt underlayment. I like to install this so that the Ice and Water shield extends up the roof for twice the distance of the eave depth. If you have a one (1) foot eave, I recommend Ice and Water Shield extend a total of three (3) feet up the roof (covering the eave, and twice the eave depth up the roof). For a two (2) foot eave, I recommend Ice and Water Shield extend a total of six (6) feet up the roof. As Ice and Water Shield comes in three (3) foot width rolls, this would correspond to either one (1) or two (2) passes. While Ice and Water Shield doesn’t prevent ice dams, it does make the roof watertight and prevents damages if ice dams form. This is why I consider it my insurance step; do everything possible to prevent ice dams from forming first and consider this insurance only. Follow these steps, and you can retire your snow rake and enjoy the winter wonderland without worrying about the danger that lurks beneath. 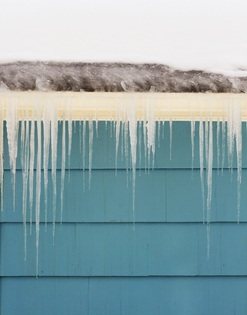 In an earlier blog, I explained what an ice dam, how it forms, and trouble it leads to. If you see evidence of an ice dam forming, you need to address this immediately. And this isn’t the time to install a new roof, although when you need a new roof you have additional opportunities to address ice dams.
Ice Dams are caused by warm air in the attic melting the exterior snow, and solving this problem is the first step in getting rid of ice dam problems. You need better attic insulation to prevent that heat from your comfy, warm house from getting into the attic space to start with. And this has the added benefit of saving you money on utility bills and making your furnace or heat pump run more efficiently (you are paying for all the heat that escapes). I recommend a minimum of R-50 insulation over your ceiling joists, and this corresponds to at least 14” of blown in, dense-packed cellulose. This isn’t 14” installed height (it is light and airy when blown in), but 14” after settling. This probably corresponds to 18” of installed height. Code minimum in Lees Summit is R-30 for ceilings, and this is insufficient to prevent ice dams from forming. Minimize the warm air escaping to the attic and minimize that snow from melting in the first place. Ice dams are caused when snowmelt from your roof hits the cold area at the eaves of your roof. This cold area refreezes the water before it can drain off the roof. This is a second opportunity in preventing ice dams (some would consider this the first, but insulation can be done from the warm confines of your home and not outside). You want a long-handled snow rake, available at many home improvement stores or through the Internet. Every time it snows, you need to get outside and get the snow off your roof. I wouldn’t worry about all of the snow; I would worry about the snow over the eaves where the ice dam forms. This way, any snow melt that forms over the heated area of your house (although minimized through additional insulation) has a straight (and fast) shot into your gutters, and once it is in your gutters it is off the roof and not causing or perpetuating an ice dam. Lack of insulation isn’t the only common heat source from your living area into the attic space. Do you have recessed lighting (can lights)? People love them; they look fantastic. Builders love them because they are cheap and people love the elegant look. Builder’s grade can lights have a unique feature in that they build-up heat and have to have a way to shed that heat. In doing so, you have to keep insulation at least 3-4” away from the housings, otherwise they overheat. And they also have vented housings. Do you use a chimney starter for your charcoal grill? Once that fire gets started, it creates a chimney effect as heat rises, and fresh combustion air is drawn in through vents in the bottom of the starter. Well, that light bulb in a can light operates the same way; heat (from the light bulb) rises and vents, and makeup air comes from directly inside your house. Every can light you have is approximately one square foot of uninsulated attic, and to make matters worse they also create a chimney effect pulling even more of your heat into the attic space. And what does that heat do? It melts snow, and that creates ice dams. Can lights need to be properly sealed in the attic, and have sufficient insulation around them to prevent heat loss. In Lees Summit, you can plan on using that roof rake several times per year. These are items you can do to prevent ice dams without calling a roofing contractor. |
Bobby WilliamsWe are an experienced Lees Summit roofing company with over 15 years experience in repair, service and installation. Archives
August 2020
Categories
All
|
 RSS Feed